Thursday, October 23, 2014

Passing all parameter arguments to irssi alias

$*        expands to all arguments passed to an alias
 
so for example, making alias /self which sends all arguments passed to it to myself using network 'Network' :
/alias self /msg -Network $N $*

Adding left navigation menu bar to Sharepoint 2010 Web Part page

Open your Web Part page in Sharepoint Designer.

Step 1 – Remove CSS
Around line 34 you will find a code block like the one below

<SharePoint:UIVersionedContent ID="WebPartPageHideQLStyles" UIVersion="4" runat="server">
<ContentTemplate>
<style type="text/css">
body #s4-leftpanel {
display:none;
}
.s4-ca {
margin-left:0px;
}
</style>
</ContentTemplate>
</SharePoint:UIVersionedContent>


Delete this code block.


Step 2 – Remove the overrides for the left column

Further down you will find three lines which prevents the left column for rendering.

<asp:Content ContentPlaceHolderId="PlaceHolderPageImage" runat="server"></asp:Content>
<asp:Content ContentPlaceHolderId="PlaceHolderNavSpacer" runat="server"></asp:Content>
<asp:Content ContentPlaceHolderId="PlaceHolderLeftNavBar" runat="server"></asp:Content>

Remove all three lines.

Step 3 – Save the page

Wednesday, September 24, 2014

How to format Date / DateTime fields in Sharepoint 2010 using custom xsl and ddwrt formatting

When getting Calendar items, use ddwrt:FormatDate to format Date/Time as your liking:

from <xsl:value-of select="ddwrt:FormatDate(string(@EventDate),2057,3)"/>
to <xsl:value-of select="ddwrt:FormatDate(string(@EndDate),2057,3)"/>


Also, you can use custom formatting with this:
<xsl:variable name="monthy" select="ddwrt:FormatDateTime(string(pubDate), 1033, 'MMMM')"/>


More Links to help you:
Available locales
Custom date formats
MSDN DateTime custom format
ms:format-date Function
XSLT Date format dd-MMM-yyyy using ddwrt:FormatDateTime
ddwrt FormatDate and FormatDateTime
How to format date value in SharePoint Data View Web Part – xslt

Monday, September 22, 2014

Weird flickering effect with HTML/CSS

Just found out that when using in-page popups, using this CSS breaks the page so that it starts flickering/strobing constantly sometimes :D
html {overflow: auto;}

So word of advice: don't use it :) Or use it with some other parameter than "auto".

How to configure Firefox to automatically reuse the login credentials like IE

You need to enable NTLM Configuration within FireFox. It is very simple to do and should solve your problem:

Open Firefox and type “about:config” in the address bar. (without the quotes of course)
In the ‘Filter’ field type the following “network.automatic-ntlm-auth.trusted-uris”
Double click the name of the preference that we just searched for

Enter the URLs of the sites you wish to pass NTLM auth info to in the form of:

http://intranet.company.com,http://email.company.lan

Notice that you can use a comma separated list in this field.

Thursday, September 18, 2014

How to disable the mystical 1px or 2px padding in table / tbody elements in Sharepoint 2010

Ever wonder, why tables get mystically some 1-2px padding around them? And any Developer console(F12) or Firebug won't show you why?
Well here's why. I guess Sharepoint(or Webkit) mystically adds a 1px invisible border around tables. Here is how to disable it with CSS:
table { border-collapse: collapse!important;}

Tuesday, September 9, 2014

Hide the Ribbon row in Sharepoint 2010-2013 modal box / dialog popup

Insert the following 3 lines of CSS code into your page:
.ms-dialog #s4-ribbonrow { 
    display: none;
}
Done!

Friday, September 5, 2014

How to trim/limit text length to a specified number of characters in Sharepoint 2010

Here I have specified 27 as the maximum length, plus three dots after the string.
<xsl:value-of select="substring(@Title, 1, 27)" />...

How to display Sharepoint List item/link in a pop-up/pop-in dialog window

Ever wondered why List items won't open in a dialog even though you have enabled "Launch forms in a dialog?" setting of the List?
Well wonder no more, and just create the popup yourself! Use this code:
<a href="javascript:OpenPopUpPage('http://mysite/Lists/Announcements/DispForm.aspx?ID={@ID}')"  >
<xsl:value-of select="substring(@Title, 1, 27)" />...</a>


btw, the code includes trimming text to 27 characters and inserting "..." in the end. Works!

Thursday, September 4, 2014

Emulating old versions of Internet Explorer with Document Mode

Press F12 to reach Developer toolbar and scroll down on the left to reach Emulation(or press CTRL+8).

The Document Mode selection lets you choose how Internet Explorer interprets the page, and can be useful for diagnosing compatibility issues. There will be a (Default) next to the mode being used by the page. You can choose another mode, the number indicates the version of Internet Explorer. Each mode makes a series of changes to the browser's behavior so that it closely emulates the older browser version. The page reloads when you choose a new mode so that the web server and client-side markup is reinterpreted in the new mode.

Changes made to the Document Mode in F12 Developer Tools apply only for the duration of the browser session; when you close the browser and return to the site it will be in the default mode again.

Starting with IE11, Edge mode is the preferred document mode; it represents the highest support for modern standards available to the browser.

Friday, August 22, 2014

Clear SharePoint Designer cache

Sometimes SharePoint Designer loses touch with reality - it demands to check out files that are not checked in, refuses to check in other files and generally misbehaves. This demeanor is sometimes accompanied by this error message:
    "Cannot perform this operation. The file is no longer checked out or has been deleted."

Simply put, SharePoint Designer is out of sync with SharePoint and you have to delete its cache in order to rebuild it. The cache is composed of these 2 folders:
    %APPDATA%\Microsoft\Web Server Extensions\Cache
    %USERPROFILE%\AppData\Local\Microsoft\WebsiteCache

Just delete their contents and you are done.
I found the solution here.

Wednesday, August 20, 2014

Set the best DOCTYPE for Sharepoint 2010, Sharepoint doctype declarations for HTML5 & CSS3

When working with advanced Sharepoint designs, one usually wants to change the document type to allow for more relaxed syntax and opportunities.

On the top of your Master page, add this:
<!DOCTYPE html>

It changes the document type to a HTML5-compliant mode.
Remember to change the meta tag "X-UA-Compatible" to a newer version, or delete it completely:
<meta http-equiv="X-UA-Compatible" content="IE=8"/>

Otherwise Internet Explorer will render the page in IE8 compatibility mode, so CSS3 & HTML5 won't work.

When using an older environment, this DOCTYPE declaration seems to be the best and also the most relaxed: HTML 4.0 Transitional in Standards Mode

So, type the following line to the top of your Master page, where the previous setting is, overwriting it:
<!DOCTYPE html PUBLIC "-//W3C//DTD html 4.01 Transitional//EN" 
"http://www.w3.org/TR/html4/loose.dtd">

Remember, don't change the DOCTYPE in your regular pages, only in the Master page! Because it doesn't work that way, it has to be on top of the rendered(master) page.

EDIT: Sometimes it might be best NOT to include any doctype definition, that might break old IE. See more info in this link:
Lots of more info & experience here.

Friday, August 8, 2014

Free web fonts

https://www.theleagueofmoveabletype.com/

@font-face definition for multiple browsers and devices using FontSquirrel

1) Download fonts to your server from FontSquirrel
2) Add these CSS definitions, change the path and font filenames if needed:

/*-- Font Definitions, free Roboto font from FontSquirrel - works with all major browsers--*/
@font-face {
    font-family: 'robotoregular';
    src: url('fonts/Roboto-Regular-webfont.eot');
    src: url('fonts/Roboto-Regular-webfont.eot?#iefix') format('embedded-opentype'),
         url('fonts/Roboto-Regular-webfont.woff') format('woff'),
         url('fonts/Roboto-Regular-webfont.ttf') format('truetype'),
         url('fonts/Roboto-Regular-webfont.svg#robotoregular') format('svg');
    font-weight: normal;
    font-style: normal;
}
@font-face {
    font-family: 'robotolight';
    src: url('fonts/Roboto-Light-webfont.eot');
    src: url('fonts/Roboto-Light-webfont.eot?#iefix') format('embedded-opentype'),
         url('fonts/Roboto-Light-webfont.woff') format('woff'),
         url('fonts/Roboto-Light-webfont.ttf') format('truetype'),
         url('fonts/Roboto-Light-webfont.svg#robotolight') format('svg');
    font-weight: normal;
    font-style: normal;
}
@font-face {
    font-family: 'robotothin';
    src: url('fonts/Roboto-Thin-webfont.eot');
    src: url('fonts/Roboto-Thin-webfont.eot?#iefix') format('embedded-opentype'),
         url('fonts/Roboto-Thin-webfont.woff') format('woff'),
         url('fonts/Roboto-Thin-webfont.ttf') format('truetype'),
         url('fonts/Roboto-Thin-webfont.svg#robotothin') format('svg');
    font-weight: normal;
    font-style: normal;
}

3) Done! It was so easy!

Here I have used 3 different weights of the same Roboto font. You can manage with only one and use the font-weight property, but I heard it's sometimes uglier method. This method ensures the best quality.

Btw I compared the same Roboto font from Google fonts and FontSquirrel:
Google Roboto is ~125kB
FontSquirrel Roboto is ~25kB

Wednesday, August 6, 2014

Centered fixed width design in SharePoint 2010 with CSS - The best way

Most of the tutorials available on the 'net don't respect the ribbon and stuff it into a design that has a fixed width. This is the fastest way to get a fixed width design and needs only the following CSS code and is flexible to be changed to any desired width.
div.s4-title.s4-lp,
body #s4-mainarea,
#s4-topheader2,
#s4-statusbarcontainer {
width: 960px;
margin: auto;
padding: 0px;
float: none;
background-image: none;
background-color: white;
}

To get the fixed width design working with the v4.master some classes needs to be added.
<div id="s4-workspace">

Needs to be changed to:
<div id="s4-workspace" class="s4-nosetwidth">

And the second html element needs to be altered:
<div id="s4-titlerow" class="s4-pr s4-notdlg s4-titlerowhidetitle">

This needs to be changed to:
<div id="s4-titlerow" class="s4-pr s4-notdlg s4-titlerowhidetitle s4-nosetwidth">

By adding the s4-nosetwidth style class SharePoint won’t assign the inline style property for width and the design will stay centered.

The size of the design could be changed to any size just by simply modifying the width property. Remember always respect the size of the ribbon and let it live outside your design for easy editing.

Original post here

Tuesday, August 5, 2014

Add custom CSS file to a Sharepoint 2010 site

Open up your current masterpage. This is usually v4.master by default,  and always located in the “_catalogs/masterpage” directory. Remember to make a copy of it and edit the copy! Then set it as your default Master page.
Right before the
<asp:contentplaceholder id="PlaceHolderAdditionalPageHead" runat="server">
</asp:contentplaceholder>


tag, put the following line of code to include a reference to your custom CSS file.

<sharepoint:cssregistration after="corev4.css" name="&lt;% $SPUrl:~SiteCollection/Style Library/Custom/styles.css %&gt;" runat="server">
</sharepoint:cssregistration>

Done!

Tuesday, July 22, 2014

SSH Port complete tunneling and forwarding for uTorrent and others

Someone(Dchard) on the Internet has found a possible solution(typos corrected):

1. Set up an SSH connection in Putty with the tunneling settings below:

- Local ports accepts connections from other hosts [tick]
- Remote ports do the same [tick]
- Set up a dynamic port forward with source port 8080 (this will force the ssh server to act as a socks server)
- Set up a remote port forward with source port 50000, and Destination 127.0.0.1:50000 (this will forward the server's 50000 port to the local 50000 port. This could be changed if port 50000 is not open on the server).

Note that the forwarded ports (remote port forward) on the server side are bound to the loopback interface by default, so you must first check your SSH server's config, and set "GatewayPorts yes" in it's config file (sshd.conf). By default GatewayPorts is set to no!

2. Connect via SSH (note that in default, only the root user can forward ports)

3. Set up uTorrent with the following settings:

- Port used for incoming connections: 50000
- Proxy server: Socks5
- Proxy address: 127.0.0.1
- Proxy port: 8080
- Select resolve hostnames through proxy
- Do not select Authentication, and Use proxy for peer to peer

Go to advanced settings an set bt.allow_same_ip to "true"

Restart uTorrent.

What we can achieve with this:

Now from behind a firewall and/or a proxy with even no direct internet connection we managed to get uTorrent working in active mode.

With the above settings the tracker announces are working, the peer list got downloaded, the uTorrent port checker says that the port forwards are OK, and the download starts and there are several incoming connections (flag I set) among the clients, and the uploads are also working fine.

Friday, July 11, 2014

Copy and sync files with rsync remotely

Copying files using rsync from remote server to local machine

Using rsync is as simple as remembering 2 or 3 parameters.

rsync -a [SOURCE] [DESTINATION]

-a uses archive mode so the file permissions and parameters are kept. It is not required.
I usually use verbose and compression, so it looks like this:
rsync -avz [SOURCE] [DESTINATION]

for remote connections, [SOURCE] and [DESTINATION] can both be in the form:
user@host:/path/

If you want to include hidden files, try:
rsync -a ~/.[^.]* /path/to/backup

Here is part of the synopsis from the rsync man page:
       Local:  rsync [OPTION...] SRC... [DEST]

       Access via remote shell:
         Pull: rsync [OPTION...] [USER@]HOST:SRC... [DEST]
         Push: rsync [OPTION...] SRC... [USER@]HOST:DEST

       Usages with just one SRC arg and no DEST arg will list the source files
       instead of copying.

You can schedule it to run in 15 minute intervals by typing "crontab -e" and adding the following line to the end:
*/15 * * * * rsync [SRC] [DEST] 1>/dev/null 2>/dev/null

Rsync hidden files from home directory for backup purposes

rsync -a ~/.[^.]* /path/to/backup

you can also use:
-v for verbose
-z for compression

Monday, July 7, 2014

Speed up computer with Ramdrive

1) Make a small Ramdisk of 64-512MB size(use Dataram Ramdisk Lite: http://memory.dataram.com/products-and-services/software/ramdisk)
2) Create a small swap file to your Ramdisk, 32-128MB is fine.
3) Move your firefox cache to the Ramdisk, limiting it's size to available space (30MB is fine if you don't have much RAM to spend), check here: Set firefox cache location
4) Restart Firefox and check if it creates the temp directory you specified(and monitor that it doesn't grow out of hand!).
5) Done!

I have found that making just a tiny Ramdisk where you put a little bit of swap seems to make computer faster. If you need more swap, create a few gigs swap somewhere on your HDD/SSD.

Friday, July 4, 2014

Compress all files including hidden files with tar

Type:
tar -cvjf compressed.tar.bz2 path/to/files/.

Wednesday, June 18, 2014

How to forward ports with Putty to a remote computer with 2 simple steps

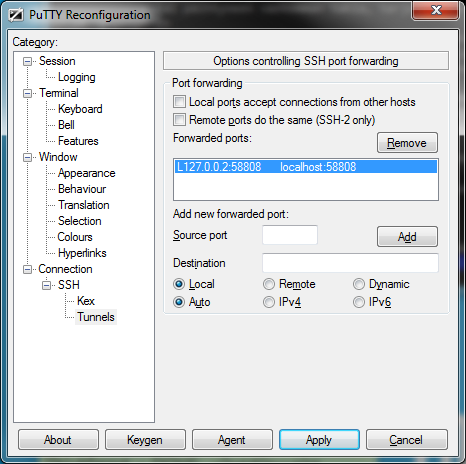
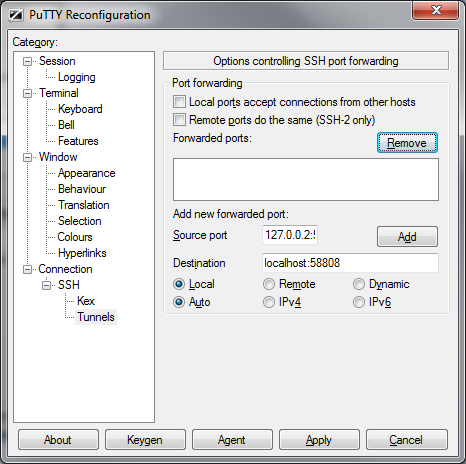
In putty configuration: Connection → SSH → Tunnels:

Here I used a random port 58808:


1) Input "127.0.0.2:58808" to Source port, you can also use "localhost:58808" or "127.0.0.1:58808", depending on compatibility and preference.
2) input "localhost:58808" to Destination,
3) Check "Local" and "Auto", then click "Add".


And you're done!

Now you can connect to your localhost(127.0.0.2) using your defined port and it will forward it to your remote computer.
You can also forward to different and multiple ports, if desired.

Thursday, May 22, 2014

Display WiFi signal strength in the terminal

You can run this command:
watch -n 1 "awk 'NR==3 {print \"WiFi Signal Strength = \" \$3 \"00 %\"}''' /proc/net/wireless"
This command has also the same function, with more info:
watch -n 1 cat /proc/net/wireless

Sunday, April 13, 2014

Move/set Firefox cache location

You can do this by creating a new hidden preference.

  • Type about:config into the location bar and press enter
  • Accept the warning message that appears, you will be taken to a list of preferences
  • Right-click somewhere in the list and select "New > String"
  • For the name of the preference type browser.cache.disk.parent_directory
  • For its value type the path to where you want to store the cache, for example d:\fftemp
  • Next locate the preference browser.cache.disk.enable, it must be set to true, if it is not, double-click on it to change its value
  • Set the size of the cache to something like 32000 to 512000 by setting browser.cache.disk.capacity (32-512MB)

  • For more information on this see: https://support.mozilla.org/en-US/questions/768867

    Monday, March 24, 2014

    Rthdribl for testing GPU stability on windows

    "RTHDRIBL is an application which is so awesome, it needed to have its awesomeness reduced by giving it a retarded name!" The name is an acronym for Real-Time High Dynamic Range Image-Based Lighting. You can download it That's all in real-time: motion blur, depth of field, reflection, refraction, and lots of other fancy effects! Official website: http://www.daionet.gr.jp/~masa/rthdribl/ It's old (2003), but that doesn't reduce it's awesomeness.

    Friday, January 17, 2014

    Best Free Android Apps

    Screen Filter
    T.E.A.M. Battery Bar
    aTimer
    Google Keep
    Irssi ConnectBot (SSH Client)
    ES File Explorer
    Roccat Power-Grid (Remote control your PC with shortcuts)
    bVNC Free (Remote control with VNC)

    For safe and private browsing & messaging:
    Orbot (+Others Below)
    ChatSecure
    Orweb: Private Web Browser


    Enabling ssl for Apache

    Website needs to be both enabled AND available.
    For this, you need to create a symbolic link into the sites-enabled folder and restart Apache:
    cd /etc/apache2/sites-enabled
    ln -s ../sites-available/default-ssl default-ssl
    /etc/init.d/apache2 reload